- Locations
- Interviews
- Luxury Home
- Luxury Lifestyle
- Luxury Travel
- Luxury News
- Events
- More
- Magazine
- Contact Us

Halloween costume ideas feel overwhelming when you want to stand out online, but the secret is not in having many clothes. One cohesive look, a clear color palette, and a few practical choices can turn a basic outfit into a scroll-stopping post.
In this guide, we will teach you how to combine makeup, wardrobe, and simple photo direction into a streamlined system for intentional and captivating Halloween social media posts.
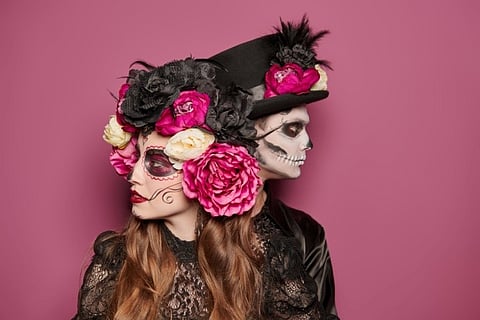
Pick a vibe — glam vampire, neon witch, porcelain ghost, etc. Browse the Halloween makeup ideas for the chosen vibe and pinpoint those you like as starting points. Lock 2–3 colors you'll repeat in eyes, nails, accessories, and backdrop.
It will ensure your face will remain the focal point even on the smallest screens, which is critical for Instagram. The focal zones usually include eyes, lips, and skin. Select the liner shape, shimmer, and lashes. Decide whether matte or glossy lips match your character's vibe better.
Pick a direction and commit: sleek center part with gel and a tight nape, or teased crown with loose pieces for movement. Anchor volume with bobby pins and a light mist of hairspray to avoid flyaways that glint in hard light.
Test one hero element at a time—graphic wing, metallic inner-corner pop, or ombré lip—then snap a quick selfie under the light you are going to use for your happy Halloween images. If the effect disappears on camera, exaggerate contrast or scale (thicker liner, darker lip, brighter highlight) until it fits your expectations.
Do a 10-minute rehearsal shoot: front, three-quarter, and profile. Check texture, symmetry, and how jewelry frames the face. If a blemish or smudge steals attention, use subtle makeup photo editing to clean distractions while keeping skin realistic. Save your best combo as a fast and repeatable mini-workflow you can easily recreate.
Start choosing what to wear for Halloween from the basics in your closet. It could be a black blazer, a long dress, or leather boots. Include at least one statement-making item. It can be a veil, choker, hat, or bold earrings. Aim for textures that read on camera (lace, vinyl, velvet). Keep silhouettes clean for phone screens and choose jewelry that catches a rim light. Remember that when it comes to spooky Halloween pictures, the outfit should complement the makeup, not vice versa.
Choose two textures that pop under light and repeat your palette accents from makeup in jewelry and nails. If the look feels busy, remove one accessory and try again. Make two fast variants so you can switch halfway through to show the variety: veil on/off, gloves on/off, jacket open/closed. Steam clothes to eliminate distracting wrinkles, and use a lint roller on anything black before you get in front of the camera.
Secure pockets for the basics (lip, powder, lash glue) to make touch-ups and re-upping without breaking your flow. A lint roller, safety pins, or double-sided tape can be lifesavers when you're bringing your bravest Halloween photo shoot ideas to life. Lastly, lay a mini "kit grid" out on the bed — outfit, hero prop, and backup earrings — so the whole look is in front of you at a glance.
The perfect lighting setup for your Halloween photoshoot does not require professional-grade lighting equipment — one key light and one small kicker will be enough to set the proper tone. Place the key at a 45° angle from your face, just above eye level; use a white wall or reflector opposite to soften shadows. A pocket flashlight or phone screen behind you can act as a rim. Use it if you have dark hair or wear a dark outfit to ensure a smooth background separation.
Stand 1–2 meters from a plain wall or curtain to avoid harsh shadows. If you have fabric, tape a sweep so it curves gently behind you. It will ensure a clean frame without creases. Add depth with tiny practicals: a candle on a side table, a dim lamp in the corner, or string lights out of focus for bokeh. Do quick tests: front, three-quarter, and profile. Check for hot spots on jewelry, glare on glossy lips, and flyaways that catch the kicker.
Create a basic pose sequence you can return to: (1) straight-on hero, (2) three-quarter with chin toward the key light, (3) profile with a shoulder roll, and (4) prop interaction, tight crop (veil's edge closeup, ringed hand, collar detail). Consistent micro-relaxations will lessen tension in your face and allow you to give more authentic expressions. Utilize a timer or remote and check after each set for any displaced hairs, lipstick smudges, or wrinkled wardrobe.
The creation of Instagram-friendly Halloween looks requires intention. With a tiny bit of thought, strategic lighting, and coordinated posing patterns, your house items and everyday-wear clothes become an Instagram sensation. The idea is not merely to post, but to influence the others who might be scrolling past. Whether celebrating with friends, or taking those selfies solo, your Halloween look can be creative and unique – all yours.
Inspired by what you read?
Get more stories like this—plus exclusive guides and resident recommendations—delivered to your inbox. Subscribe to our exclusive newsletter
The products and experiences featured on RESIDENT™ are independently selected by our editorial team. We may receive compensation from retailers and partners when readers engage with or make purchases through certain links.